It’s been a hectic week and a bit, so fewer posts. As you probably saw, I’ve managed to clean up and post one of the last of the RPG play reports for the Old-School game I ran earlier. I’m really looking forward to being finished those. They’ve accomplished their goal of reconnecting me with running games, and I’m more than a little tempted to just stop where I am as the story line drags and becomes hard to follow. It is also a fair bit of editing work to get it out as a post. Mind you, I do like finishing tasks, so I may yet continue.
The weather here has been warmer than normal – and that is saying something. Here on Vancouver Island we’re blessed with very moderate winters and this winter has been warmer than most. Evidence is below:
Snowdrops seen on a hike near my house
So can’t really complain about that when I have family in Ottawa dealing with being colder than Mars.
I’m still slowly working at getting terrain sorted for the Arnhem campaign we’re looking to start next month. I’ve managed to get some fencing done, along with the first bit of work done on the Timeline Outbuilding. There needs to be some flocking added and some weathering and touch-ups, but the 4Ground fence was a quick and easy build and I’m going to turn my attention to some larger structures next. The good thing about doing this prep is that it will make it much easier for me to run games as my collection of terrain is growing nicely.
Fence needs to be flocked, farm yard needs texture, some weathering needed on the building but things are moving in the right direction!
I did managed to get a game in of “A Test of Honour” last week, which was great. I really enjoy the game and it’s probably my favourite skirmish wargame to date.
Nate brought over some lovely terrain and his terrain mat from Euro mats:
The terrain was made in Europe for Infinity (a sci-fi skirmish game) but it lends itself very well to what we want to use it for.
The battle was a simple seize the objectives fight, with a turn limit and reinforcements for the defender. I defended and tried to concentrate my forces, while Nate threw his samurai up one side, hoping to knock my samurai out and take the centre of the table. It ended up being a lopsided victory as my samurai was able to defeat Nate’s 2 samurai and my spears threw his ashigaru back. Not so much of a victory based on superior planning, but I remember someone talking of lucky generals before so I will not complain that the dice greatly favoured me. No good pictures sadly, except of these lovely buildings. They come pre-painted and the doors are removable.
So overall, things are looking like I’ll be able to get some more gaming done soon. For the next Test of Honour fight I’m hoping to do a proper AAR as the game certainly warrants the attention. More terrain to come, and hopefully a game of What a Tanker later this week!
My gaming group has been playing some Warmachine and Iron Kingdoms RPG lately, but as mentioned earlier, the man running the game is getting busy. As such, I’ve started to run some adventures set in Middle Earth. It’s a setting that everyone knows, and the published background and adventures from Cubicle 7 are excellent and easy to run.
Now with the Christmas season upon us, I knew that it was quite possible that I would need to run the next adventure in the campaign in very short notice. In that adventure, the heroes are supposed to find a ring fort, or at least the ruins of one. When I think of ring forts, Cahergall in County Kerry comes to mind.
Cahergall near Cahersiveen, Co Kerry. Ballycarberry Castle in the background (which is a lovely ruin). The interior of this ring fort is quite something. Stairs and levels everywhere. It almost seemed like it was half auditorium, half defensive site. (My photo).
While I do want to build up a ring fort like Cahergall eventually, there was no way that I was going to carve thousands of small stones, especially on a compressed timeline. Now, I could have simply drawn out the terrain on the whiteboard we use, but I figured that I could piece together something reasonable with limited effort. My intent was to finish this over the course of 3 dark and rainy evenings before the possible game date. I figured I could spare about an hour each night. This meant I had to keep moving and not let any roadblocks or mistakes slow me at all.
Step One: The Plan
As I was putting my progeny to sleep, I drew out a very simple layout of a ring fort that I could build with some scraps of foam I had. This plan was drawn on my phone, so wasn’t detailed and was also limited by materials hidden away in my gaming supplies: some bits of extruded foam (that I had used under a terrain matt) that were small in size and I had some blue foam kicking around, but not a full sheet, in fact, merely off cuts. The plan was fairly simple. A way in, and out. Two layers of foam to make a hill, some bushes, and ruined walls:
Initial thoughts on the ruin. 2 layers thick, a ruined wall with a small interior wall as well. The “s” marks a statue.
Step Two: Rough Assembly
I started the clock and got to work.
First, the sheets of white extruded foam. Much smaller than I had remembered. My maximum base size was set. I knew that I needed to carve the sides down to make a somewhat gentle slope. That would also reduce the amount of space up top.
With a rough shape for the top of the hill drawn out (and carved by pencil by my spawn), I took my hot wire cutter and started to cut away and smooth down the sides, checking to see if minis could stand on the slopes. There was no way that there was enough room to make a real ringfort, not by a long shot. I had to keep moving and roll with the punches.
The real premise about the ringfort was that it was an old ruin that was also a defensible strongpoint. This meant that as long as this was a ruin and met the criteria of having a way in and out I was good. A ruined tower or part of a larger, disappeared building would work. That allows me to have asymmetry – great, backstory for oddities. I cut up the blue foam into some simple pieces that I tried out against the basic shape of the hill I had.
The second fitting shown here. I was pretty sure that this is what I wanted so I had started to carve off the ends of the walls so they would fit together well (enough). The paths are clearly marked, as is the location for the statue. A smaller scale tree is helping to give me an idea of what looks good where.
I tried about 4 different layouts before figuring out which pieces I wanted on the ground where. The second layer and internal wall bits were moved around a lot, but despite difference in thickness and some awkward joins (I did not accurately measure my cuts to join the pieces together), I figured this was going well. I had a small area for a tree, and another for a statue, as per my original plan. There would be an entrance and exit, and the elevated walls would make this defendable. I used white glue and toothpicks to secure everything and called it a night.
Step Three: Carving the details and undercoating
I guess that is pretty much two separate things, but it took such little time that I lumped this together. I carved the walls while they were in place on the hill. I didn’t use a template at all, just free-handed it very quickly. In 15 minutes I had finished the carving (with some errors) and then threw on a burnt umber coat on the base layer and a strong black on the walls.
A very quick paint job with some inexpensive acrylic craft paints. You can see that not everything is actually in its final form yet. At this point I noticed that the side with the low walls was looking pretty sad and needed a tall tree to balance it out.
Step Four: Flocking
Flocking was next. I didn’t blend anything, or do anything fancy. Simply watered white glue, some flock, and some sand. I left some bare earth areas as well as I felt that it looked pretty good along the steeper edges of the build. I put in a cheap tree from an internet purchase.
A quick flocking and tree glued in place. The piece was starting to come together. You can see some unpainted figures I was using to make sure that the slopes were gentle enough to allow minis to stand on.
Step Five: Grey for the stone
Next was a coat of grey paint. I applied it a bit too thickly in places, but it was another 15 minutes so the return of investment for the time was pretty good.
A coat of grey over the black. The paint dried unevenly as the terrain piece was close to some work lights in my cold addition. I rather liked how it made the paint assume a different colour.
Step Six: Dry brushing the stone
I needed to lighten up the stone. I like using three coats of grey on top of black for stones, with the last being an aluminum white. For this, I only went with two. I simply lightened up the grey and threw another coat on, again a bit too thickly but I think rather effectively.
It seems like overkill but when the piece fully dried it looked much better
Step Seven: Hiding Errors
I stood back and then paused. There were some places that the two pieces of white foam were clearly separated. In other areas the walls were too widely spaced. I wanted to hide some of the imperfections. Mistakes! Never. Flock that! I figured. So I did.
Flock and bushes coveres up most of the gaps in the white foam. I left the rough cut up areas near the top of the walls as I like how it looks. Some poor paint coverage in the far corner was covered with some underbrush and darker flock to make a dripping alcove. I also added some sea foam to make the terrain more interesting on the statue side.
As you can see, the result is pretty good, especially in comparison to a whiteboard. This will hopefully make the combat around this terrain piece be a bit more dynamic and memorable.
Step Eight: Sprucing it up with a simple statue
I really enjoy having the statue detached, as it allows me to change the piece up.
Blocking off one of the ways in but blending in nicelyThe statue blocking off the other entrance, but looking rather stately hereAnd standing proudly on the walls!
There are always flaws in a work, and I can clearly see where I went wrong, and there is also a lot more I could do to make this piece perfect. I will likely work on the flock a bit, maybe add some rubble and some more small plants. But for now, I’m extremely pleased with how this has turned out. It’ll move to a shelf in anticipation of a Yuletide goblin killing with friends.
Time Breakdown: Did I finish it in time?
The total time I spent on this project is roughly as follows (I looked at the time after each bit but I was hardly scientific about it):
25 minutes of drawing on and cutting the white foam
20 minutes cutting the blue foam into wall segments
15 minutes choosing the layout and gluing in place
15 minutes carving relief into the walls
20 minutes painting the undercoat for the ground and walls
20 minutes flocking (hard to say, I was on the phone as I did this and but it was shorter than the call)
15 minutes painting the first coast of grey
15 minutes on the second coat
15 minutes to put on the foliage
So, a total time for the project of 2h40 minutes over 3 evenings (not including the blogging and picture taking/uploading/editing). I would say that doing this in 3 hours of building is reasonable. I did start with a plan, and did think about how I was going to approach each step during the day so there was no delay in getting things done once I repaired up to my hobby room.
Lessons Learned
You can do a pretty good build of terrain in 3 hours if you have a clear plan and aren’t too focussed on making it perfect. Perfection is absolutely the enemy of good enough for fast builds.
Small errors can be covered up and corrected easily at later stages. Like Bob Ross says, there are no mistakes, just happy accidents.
Despite number 2, if you are joining 2 layers of foam, it is very difficult to correct once you start flocking.
Simple trees can really balance out the look of a piece and make it look complete.
Statues and the like, if left unattached, add versatility to the work
Overall,
I hope you enjoyed seeing how I mashed this together. I really enjoyed building this and it was quite something to see it take shape so fast. I have a feeling that once I finish off painting my 28mm WW2 buildings I’ll be getting some foam and making some more terrain.
Note: Terrains4Games provided these products free of charge to SPQVI for the purpose of this review. We are in no way affiliated with Terrains4Games and have received no fiscal compensation for this review. I intend to post balanced reviews of the products that I receive or purchase, and I will always let you know if I’ve received the products free of charge, as in this case.
Terrains4Games, a terrain company based in Poland, is putting out a new products to add to their line of MDF Prussian buildings. These buildings are available in 15, 20, and 28mm scale. The buildings are laser cut, and sent on sprues. In order to assemble these buildings, you will need a craft/hobby knife and white glue. I used a small file to help clean the parts and elastics to hold pieces in place when gluing but otherwise used no special tooling.
I have not added to the buildings in any way, either adding filler to gaps or putting roofing tiles on. I want you to see the product as is. I have assembled them with white glue and given them a basic painting using some artist’s acrylic paint and some Vallejo chocolate brown for the wood paneling. What you see in the pictures below is what you get out of the package and painted with a minimum of skill.
The Box
I received 4 buildings, 3 of which I will review here (with an explanation as to why I am not doing a review of the 4th building below). All of the buildings I received are in 15mm scale and come on 3mm MDF for the building walls, floors, and roofs. The wood paneling and framing comes on 2mm MDF.
The box as opened. Terrains4Games products are typically well packaged and this one is no exception.
The box that the products arrived in was well packaged, and despite rotating strike action by Canada Post, travelled 8500km in just two weeks showing the prompt dispatching from the company. The sprues were wrapped in clear plastic and were protected by bubble wrap.
The packaged buildings
Barn II
The first building I built was the barn. It retails for $9 USD and is worth the money.
I have the original barn from the Prussian Village, and it has been well used. I’m happy to note that this design is very different from the other barn so this expanded range really allows you to increase variability on the game table.
The barn on its sprues
Instead of a long rectangular building, this building is squarish with a long
sloping roof and wood paneling and framing which gives added depth. Having lived for several years in southern Germany, this building made sense to me and would be right at home across many periods of warfare in Europe or a pseudo-European fantasy land.
A nice looking building with one small issue…
There is a small but easily fixed issue with this building. The back wall sits a little too high to fit into the lugs on the base and would not allow the roof to sit down properly. I simply trimmed the sides using a hobby knife and the pieces fit well.
The back wall not fitting down properly into the base. The tabs on the side are too tall, and need to be trimmed from the bottom. I used a hobby knife and my file and was able to fix this issue easily.
Back wall trimmed down to fit properly
The barn with back wall showing no signs of the work done
The barn
Barn II (to the left) and Barn I (to the right). You can see the different building types but common Prussian styling clearly.
Granary II
This is a relatively tall building, but is very simple in construction. It retails for the very reasonable price of $10 USD.
I used elastics to keep everything tight as the glue dried, both in the initial construction and once I add the wood framing. The wood framing has a nice design and it’s easy to see how it fits over the windows. The framing pattern isn’t just a box pattern which adds to the feel of this piece.
The granary as it comes.
Without any wood framing
An imposing edifice (if you’re 17mm tall)
The granary is a simple but effective kit and well worth the money.
It is a solid, all round addition to your games table and adds to the height of the town, making it seem more real.
Inn
This is a great building. It is not listed on the site yet, but I can guarantee that it will be worth the money. This building is easy to put together and looks great. There is an overhang with posts connecting to flagstones, there are several wood frames to put on, and despite the potential for error it all fits together perfectly. I enjoyed building this and I really think that this piece could fit in a wide variety of European and pseudo-European settings.
There is one small point for improvement. There are 2 sprues labelled as number 8/8. That, however, is the only mistake on this great kit, and yes, that’s how deep I had to dig to find something to improve upon.
While assembling, I made the walls first and allowed them to dry before adding on the overhang and front upper wall. The pieces fit together nicely and it was easy to keep the overhang true and not sagging down or trending upwards. The wood framing slides in nicely over the lower floor and I needed to do no extra trimming to make things work.
The 8 sprues of the inn with the pedantic reviewer noticing the labelling error.
The inn looks great. It’s suitable for far more than Prussian countrysides
The inn fits 15mm figures nicely (the figure is a Bavarian from Essex).
This is the best piece of the bunch and I highly recommend it. The stone work on the lower level with the detailed wood framing above and the tile roof topping it off looks great. The overhang really adds depth to the piece and the details are wonderful. This piece will be the centre point for the village, I’ve no doubt.
Church
I will not be posting a full review of the Prussian church here as I’m having some difficulty assembling the last bits of it. This is a pre-production model I’ve received and I do not have instructions. The other buildings were extremely intuitive but this one is a bit harder coming on 16 sprues. I made a small error (easily fixed) once already in the construction, and I’m having a hard time figuring out if I’m missing a piece on the church entrance or if there is a minor design error. The rest of the building is built and ready to go. I am waiting for Terrains4Games to get back to me on the entrance piece before I give my thoughts on the building as a whole as I don’t want to criticize when the source of the issue isn’t clear.
I want to assure you all that the problem I’ve found is small. I shall give an update to this review once I’ve finished putting it together in accordance with the manufacturer’s instructions.
Overall
These new offerings from Terrains4Games are excellent. The buildings are well made and exceptionally well priced. While there is the small issue with “Barn II” it was minor and took me under 5 minutes to solve. To put this into perspective, Sarissa Precision, a much larger company with more expensive offerings, gave me much more trouble for their much more expensive chateau (see the Sarissa Precision Review).
The Prussian buildings with 15mm Essex Bavarians for scale. The village options really bring to life a central European town.
Like all MDF buildings, these take several coats of paint, and the joining lugs take paint poorly. The great thing about these kits is that the wood framing nicely conceals the lugs which really adds to the realism without any additional work. The framing adds a lot of detail and depth to the buildings and looks quite fetching. The lugs are, however, clearly visible on the roofs, but there is nothing that would prevent a wargamer from putting their own roofing tiles over the roof to enhance the look of the buildings. .
These new buildings really expand the Prussian Village line. The designs compliment each other nicely and yet are different enough to keep the eye interested. They fit with 15mm scale miniatures well, as intended. For those that use smaller scale buildings than troops to reflect ground scale, these buildings would work well for 20mm but their great detail accentuates their scale and makes them seem toy-sized for 28mm.
Terrains4Games has an increasing catalogue of great wargaming products (I have reviewed some earlier here). The realistic and detailed design of these new buildings, coupled with the price point they are offered at, makes them a welcome addition to the wargaming market and I highly recommend them.
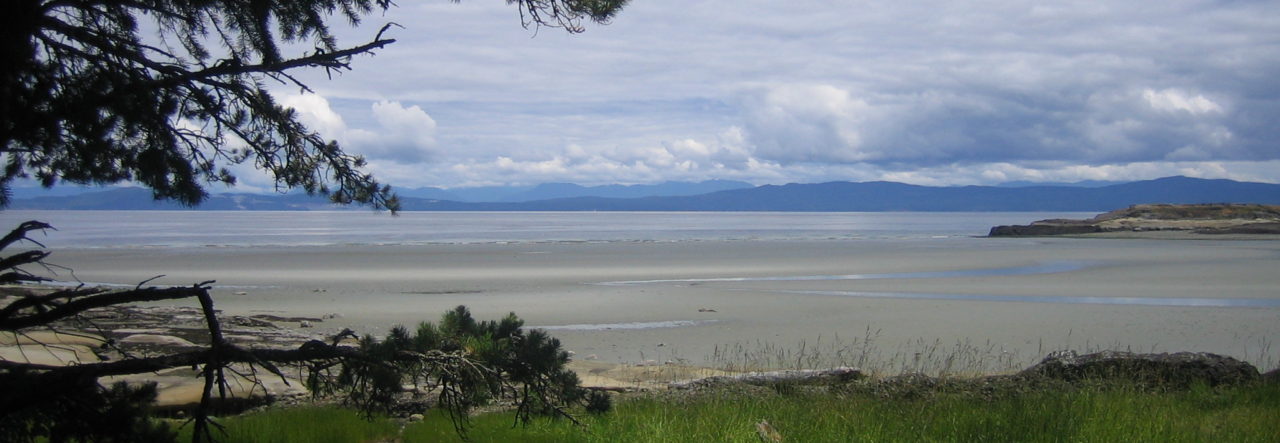
Well, we’ve had a break in the rain here, and it’s been gorgeous.
No, that’s not the Lonely Mountain in the centre, that’s Mount Baker 116km away peaking up over the San Juan Islands. The picture was taken in a Garry Oak meadow that’s ready for the rains. And yes, 116km. There’s a plinth nearby with the measurement.
Sorry for the over exposure. The white below the mountains in the distance is thick, thick fog that flows into the Straits of Juan de Fuca and has nicely stayed away for some sunny days
On the gaming front I’ve finished my wire fencing, and also put together some 4Ground barbed wire barricades. The fencing has turned out okay, but when I need more I’ll be building them a bit differently. I’ll probably use skewers in MDF as balsa is just too flimsy. I’m happy enough with them, considering the time and energy involved but they’ll be touched up sometime.
The wire fences are done for now. I’ll probably weather the wire later and dress up the base more, but they do the trick and it’s time for me to finish getting bigger piece of terrain finished
I’ve also noticed that my shortening RPG blog list on this site is no aberration. Monsters and Manuals, a great RPG blog, has decided to stop blogging. Dungeon of Signs (who created some great adventures) did so about a year ago. Many of the blogs that I enjoyed in the OSR community (a community centered around the return to an older style of play or “Old School Renaissance” in RPGs) seem to be going dark. Now, I know that people say that 10 years is the lifespan of an average blog, but as blogging is relatively new, I’m not sure how much I trust that data set. I think it in the OSR world, it has more to do with acrimonious debate and incivility. The debate tends to be about things ranging from gender-roles in game worlds to what Saint Gygax wrote (seriously, to some people everything in the first editions is sacrosanct). There seems to be increasing polarity, and that is being coupled with RPG blogs being used less to share interesting ideas in the hobby and more to reinforce how others are having BADWRONGFUN and that they alone hold the answer to how to have fun as is proper.
Personally, I’ve avoided reading blogs that focus on debate, choosing to frequent blogs that share an interesting take on a particular narrative or rules situation, or neat adventure hooks and so on. Monsters and Manuals had the great idea of a world that rotates slowly and nights last hundreds of years. The edges of darkness would be full of strife with creatures from the darkness running rampant while nomadic cultures would rediscover old ruins when they once again returned to the light. Great stuff and really thought provoking. So, it’s sad to see blogs that come up with gems that you can chew on go dark. It’s also sad to see people lose faith in each other and merely use the Internet as a medium for attack and not discourse or support.
The online wargaming community certainly has its share of characters and opinions, but in my limited experience, it seems to be far more about sharing the joy of the hobby than to bash others. I think that’s why the list of wargaming blogs I’m following is steadily increasing (and if you have blog suggestion, please pass it on).
So, if you’re feeling offended when you read a blog post and want to write something nasty, think twice. Instead, keep on gaming and sharing stories, and pictures and your crazy project ideas. I know my lead pile needs more reasons to keep growing.